ゴリラスタジオ監修のGarageBandの本、Kindleで大好評発売中!音楽制作の未知なる領域を探求したい方必見です!
GarageBandの使い方からスコアの作成、MIDIの操作まで、わかりやすく解説しています。
ミックスのテクニックや音源のデータ共有についても詳しく解説しており、目次を使って簡単に目的の情報にアクセスできます。
さらに、新しい情報も随時公開されるので常に最新のトピックが手に入ります。
ゴリラシリーズの一冊にして、音楽制作のスキルを飛躍的に向上させましょう!
はじめに
みなさんこんにちは。
GarageBandで新たな音楽の旅を始めませんか?
GarageBandエディタボタンの使い方をマスターすれば、あなたの創造力を自由に発揮し、独自のサウンドを作り上げることができます。
リズムからメロディーまで、あなたのアイデアを形にするための手助けをするこのボタンの秘密に迫ります。それでは本日も一緒に見ていきましょう。
エディタボタンとは
エディタボタンを押すと、個々のトラックとリージョンを編集できます。また、細かな編集や内容を操作することもできるようになります。
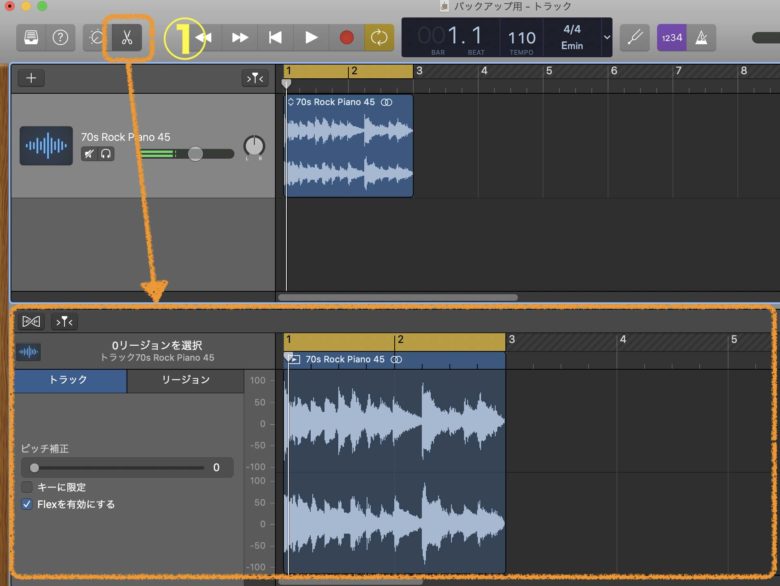
①のハサミマークを押すか、リージョンをダブルクリックすることで、詳細をエディットすることができるようになります。
ピアノロールエディタ
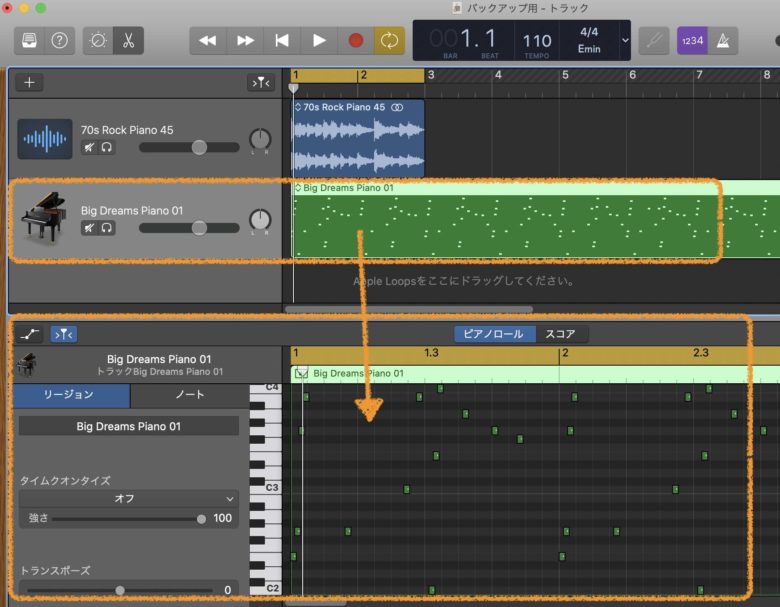
ピアノロールエディタには、ソフトウェア音源や外部のMIDI音源、選択したトラックのMIDI音源が表示されます。
ここでは、MIDIを扱うことができ、MIDIノート(音符)の長さを設定したり、音の強さ弱さを設定できるようになります。
それでは使い方を見ていきましょう。
リージョンを操作する前に
GarageBandのリージョンは、DTMをする人にとっては無くてはならない存在になります。
リージョンと聞いても「専門用語を言われてもわかりません。」と思われるかもしれませんが、リージョンを理解することで、素早く編集をすることができるようになります。
リージョンはオーディオリージョン、MIDIリージョン、Drummerリージョンの3種類存在しています。
楽器の演奏を録音できたり、MIDIノートの編集、ドラムのパターン変更などさまざまなことが実行できますし、編集方法を覚えることでクリエイティブに楽曲を作成することも可能になります。
それでは、このリージョンの編集で、どんなことができるのか一緒に見ていきましょう。
リージョンを選択する
リージョンを編集するには、リージョンを選択する必要があります。
選ばれたリージョンは、少し明るくなり表示されるので、一目でどのリージョンが選ばれているのか、わかるようになっています。
また、リージョンは1つ選択することも複数選択することもできるので、編集が必要なリージョンを選び、都度調整していく形になります。
一つ目の方法は、トラック内のすべてのリージョンを選択し、左クリックしたまま全体に動かしてリージョンを選択します。
もう一つの方法は、キーボードのショートカットキーを使用します。
ショートカットキーは『command⌘+A』ですべてのリージョンを選択することができます。

リージョンをソロにしたりミュートする
リージョンをソロにしたりミュートすることで、ソロにしたトラックを聴きやすくし、編集できるようになります。
また、いらないトラックをミュートすることで、そのリージョンを楽曲から抜いて聴くことができます。
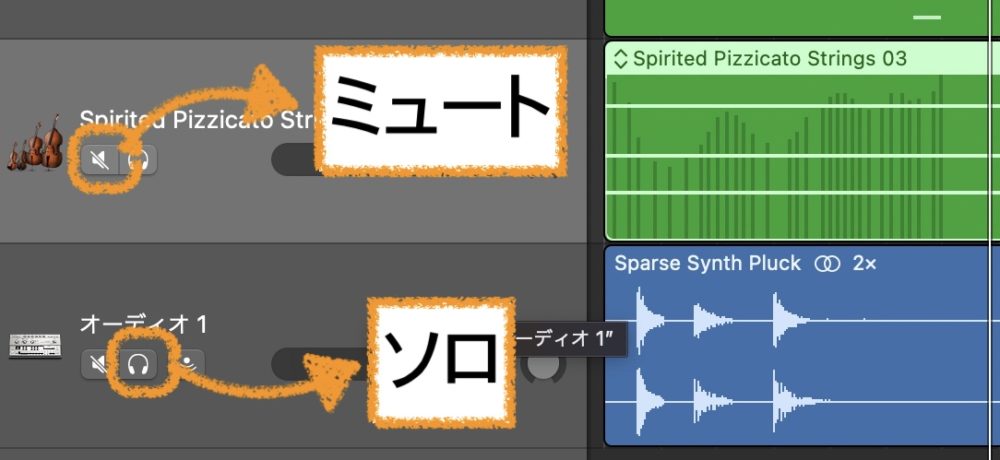
ミュートは![]() このマークを押します。ソロは、
このマークを押します。ソロは、![]() このマークをクリックするとソロになります。
このマークをクリックするとソロになります。
セーフソロ
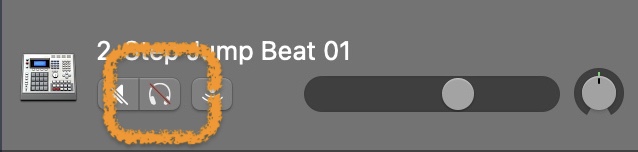
Logic Proには、ソロボタンの他にセーフソロという機能があります。
セーフソロを設定すると、ソロのボタンに赤い斜線が入ります。
これは、トラックやグループのソロをオンにしても、他のトラックやグループの音が聞こえるようにすることができる機能になります。
例えば、ドラムの音をソロにしてドラムとベースの音を聞きながら調整する場合には、セーフソロを使用し、ミックスのバランスを調整したり、特定の音をミックスに追加したりすることができます。
もちろん、ドラムとベース以外の音はミュートされます。
セーフソロを使用するには、以下の手順を実行します。
1、ソロにしたいトラックを選択します。
2、ソロボタンの上にカーソルを合わせてControlを押しながらクリックします。

3、ソロボタンに赤い斜線がつくので、そのトラックは常に音が鳴るようになります。
4、解除するには、もう一度Controlを押しながらクリックすることで解除できます。
注意点として、Safe Soloはトラックごとに有効にする必要があるため、多数のトラックを持つセッションで使用すると、管理が困難になる場合があります。
ただし、ミックスのバランスを調整するときには、非常に便利な機能であるため、一度試してみると良いかもしれません。
GarageBandでリージョンごとにミュートする
GarageBandでは、リージョンごとにミュートをすることができません。
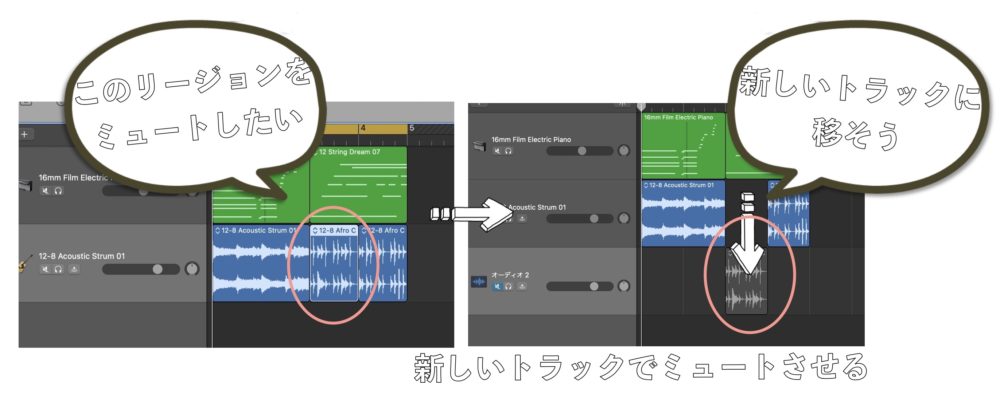
リージョンごとにミュートしたい場合には、ミュートしたいトラックを別のトラックに移して、トラックごとのミュート機能を使って音を消しましょう。 手間はかかりますが、これが一番早いミュート方法になります。
アップデートで変更されるのを期待しておきましょう。
リージョンをトラックごと入れ替える
リージョンをトラックごと入れ替えることができます。これをすることで、トラックの順番を変更することができ、画面を見やすくカスタマイズすることが可能になります。
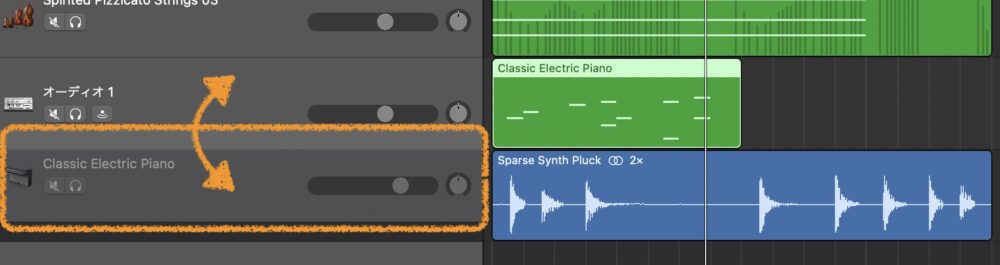
トラックをクリックして入れ替えたいところにドラッグすると、トラックを入れ替えることができます。
リージョンにロックがかかった場合
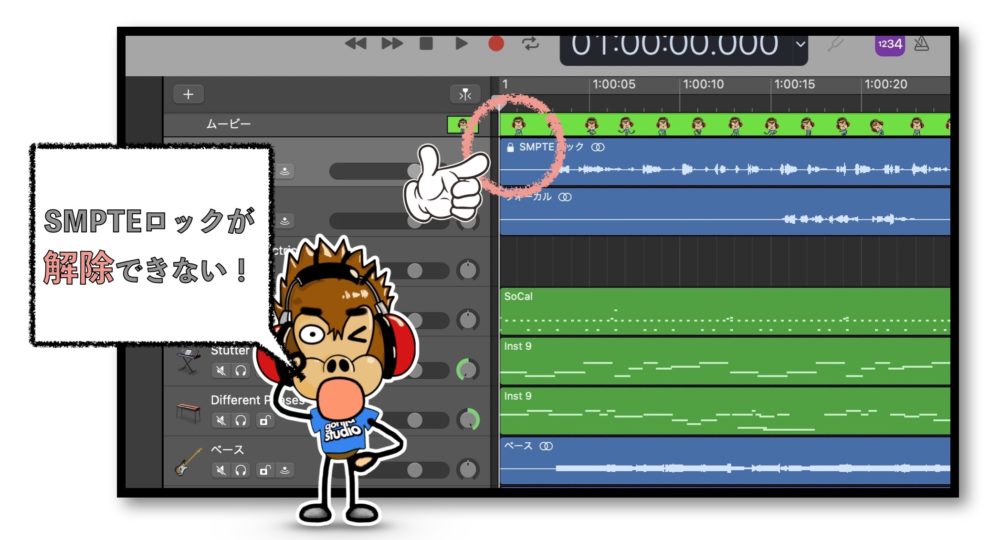
動画付きの音声ファイルをGarageBandに読み込ませると、リージョンにロックがかかり、音声データを動かせなくなります。(リージョンの左上に鍵のアイコンがつきます。)
この現象をSMPTEロックと言い、画像と音声がズレないようにGarageBandがロックを自動でかけてくれるのです。
音声と映像がズレないのでありがたい部分もありますが、音声リージョンを動かしたいときもあります。
そのようなときには、SMPTEロックを解除する必要が出てきますので、解除の手順を紹介します。
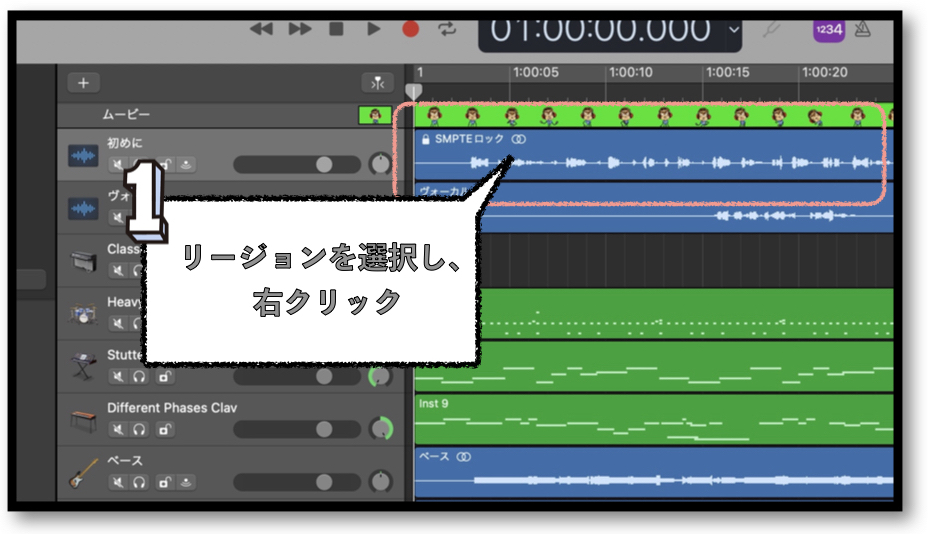
1.SMPTEロックがかかっているリージョンをクリックし、『右クリック』する。
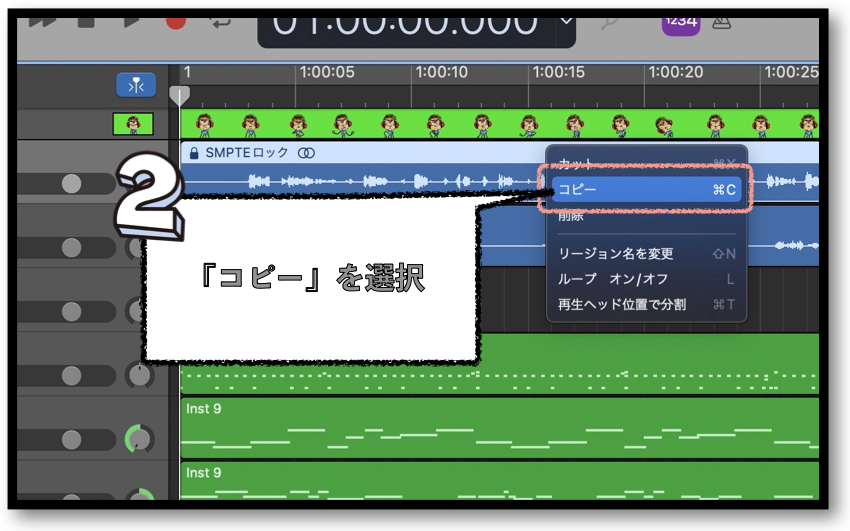
2.ポップアップメニューから『コピー』をクリックする。
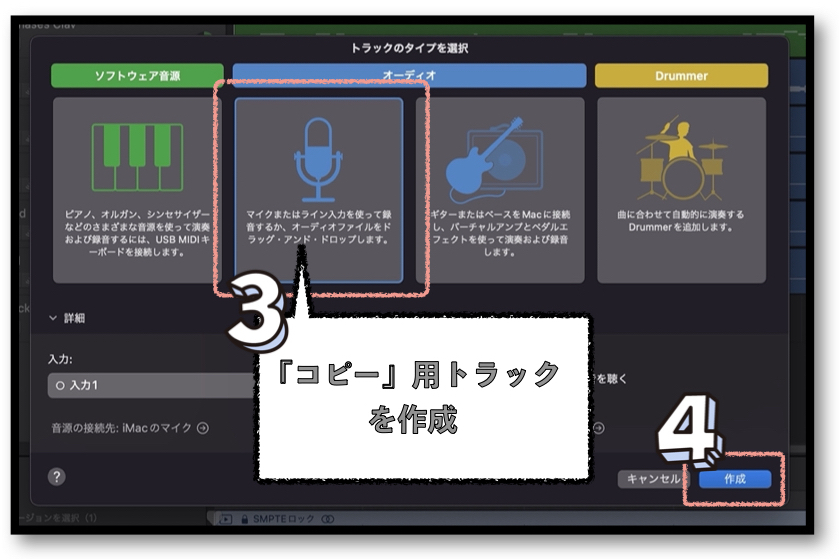
3.新しいオーディオトラックを選択する。
4.作成を押す
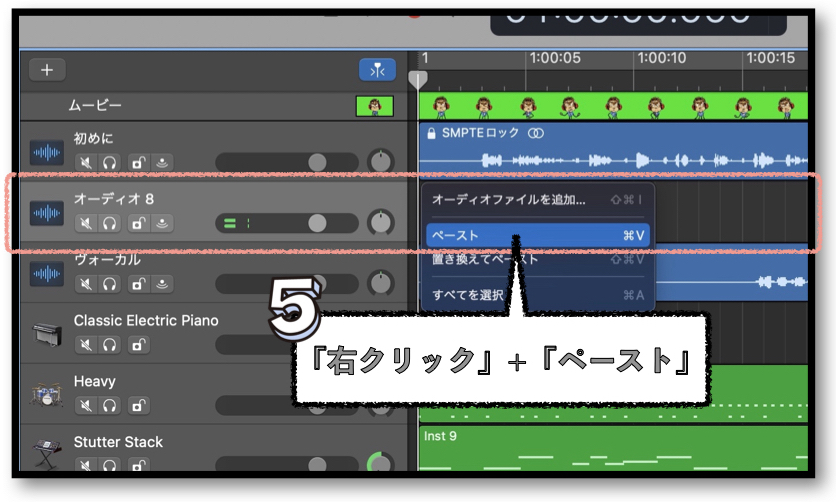
5.作成したトラックを選択し、右クリック、ポップアップメニューの中の『ペースト』を選択する。
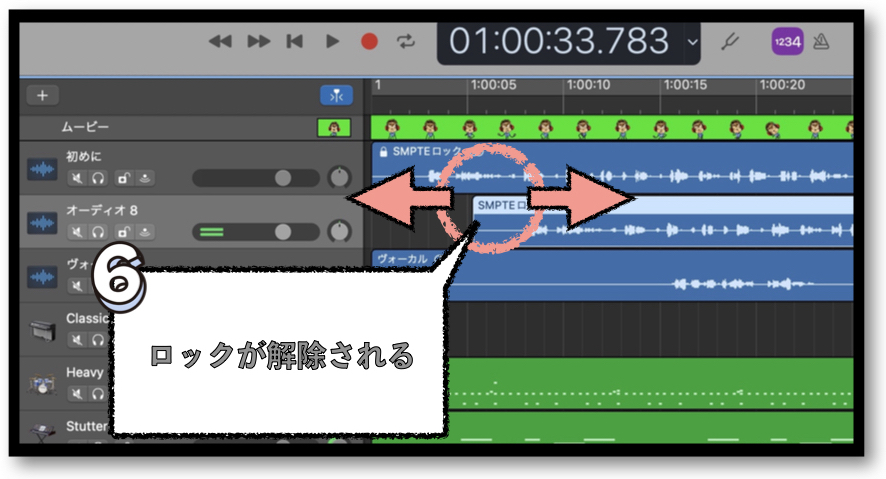
6.新しいトラックにコピーされたリージョンができます。
このリージョンは、SMPTEロックが解除されているので、自由に動かすことができます。
MIDIリージョンを編集する
MIDIリージョンをダブルクリックし、MIDIエディタ画面を開きます。
MIDIリージョンに打ち込むためには、マウスなどでも打ち込むことができますが、MIDIキーボードを使うことをお勧めします。
MIDIキーボードを使うことで、素早く打ち込むことができるので作業効率がかなりアップします。
ネイティブインストゥルメンツのキーボードが扱いやすく、音源も豊富にあるため、お勧めのキーボードになります。
MIDIリージョンの複製
リージョンのこの場所にカーソルを合わせると、MIDIリージョンを複製することができます。
リージョンを右にドラッグすることで複製ができます。
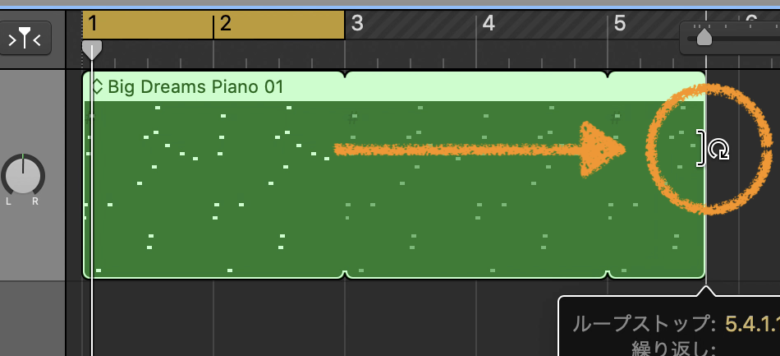
同じリージョンが作成され、複製元のリージョンを変更すると、複製したリージョンの内容も同じように変更されますので、とても簡単に複製ができます。
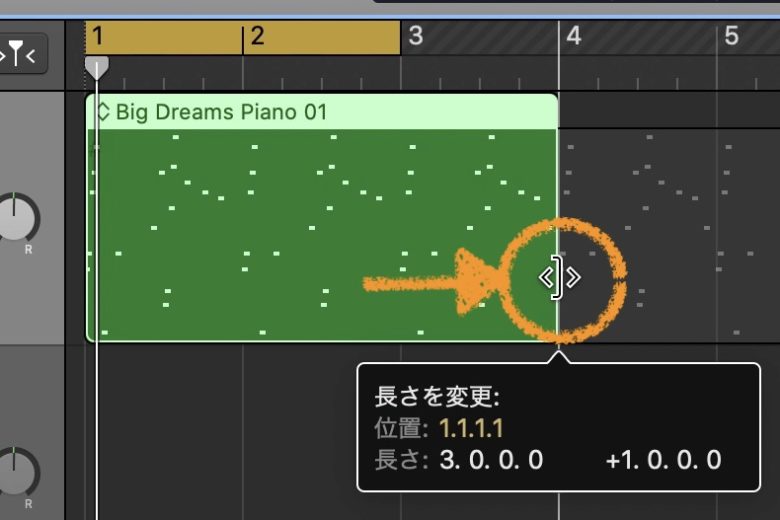
リージョンを伸ばしたり縮めたりする
リージョンの右下をドラッグし左右に動かすことでリージョンを伸ばしたり縮めたりすることができます。
いらない箇所を削ったり、リージョンを元の長さまで伸ばしたりすることができます。
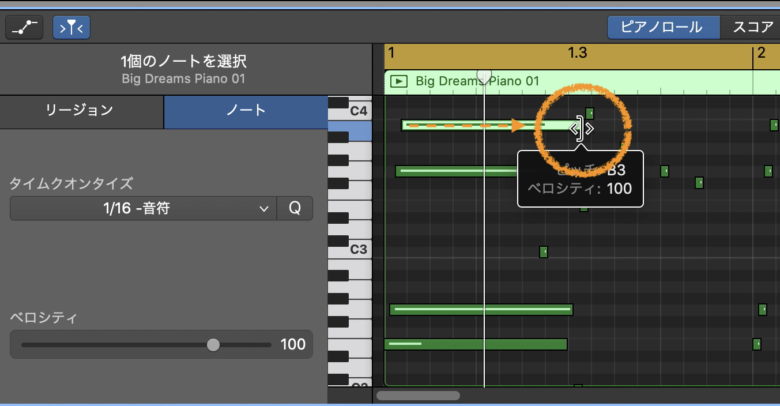
MIDIノートの長さを変更する
MIDIノートの端をドラッグし左右に動かすと、ノートの長さを変更することができます。
MIDIノートのベロシティ(音の強弱)を変更する
ベロシティ(音の強弱)は①のノートを選択し、②のベロシティスライドバーを左右に動かすことで、ノートに強弱をつけることができます。
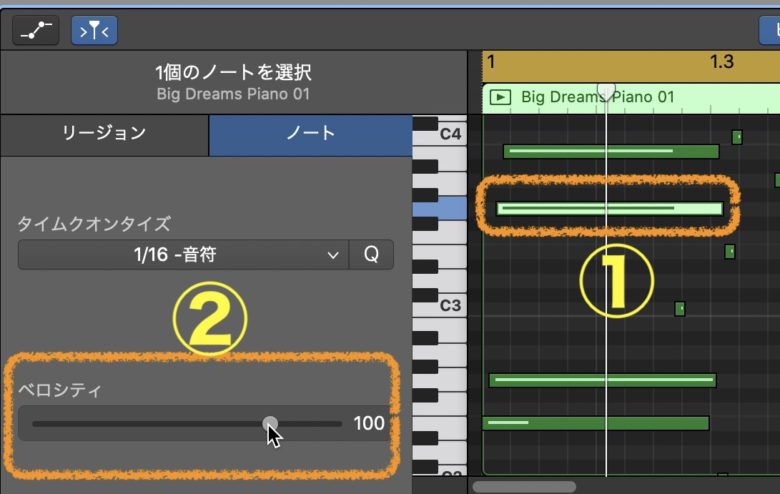
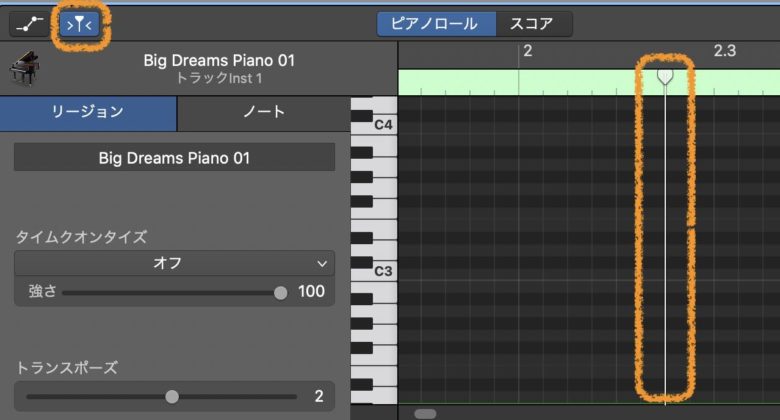
ノートの強弱を見るには、下の画像を参照してください。
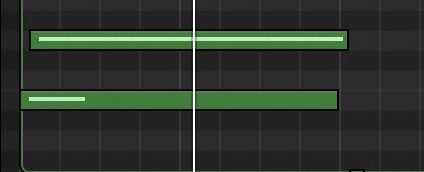
上のノートはベロシティが強い状態です。ノートの中の線が右端まで伸びています。ベロシティの値を大きくすると右端まで線が伸び(上のノート)値を小さくすると、線が短くなります。(したのノート)
クオンタイズ を使う
MIDIノートが少しずれた場合は、MIDIノートをクオンタイズ することでノートを小節に合わせることができます。
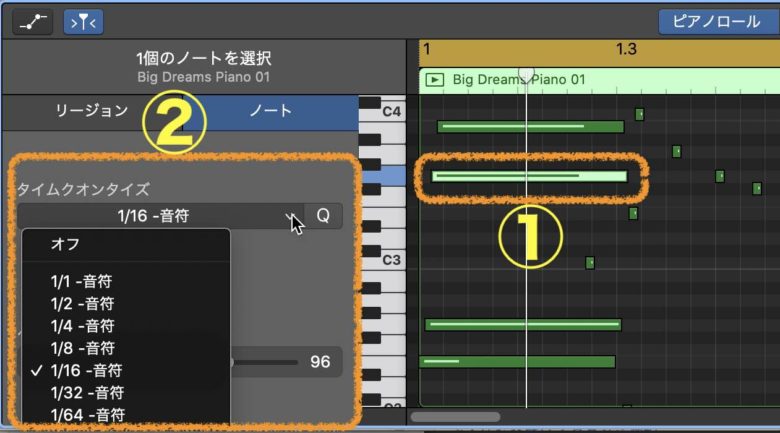
①のノートを選び、②のクオンタイズ を使用します。
詳しくは、『GarageBandでクオンタイズ を適用する』を確認してください。
トランスポーズ機能を使う
トランスポーズとは、選んだMIDIリージョンのMIDIノートはそのままに、音の高さを変更することができる大変便利な機能になります。
ドの音を+2上げるとレの音になります。ドから数えて+2になるのでレってことですね。
+5上げるとファの音になります。『−』(マイナス)方向も考え方は同じです。
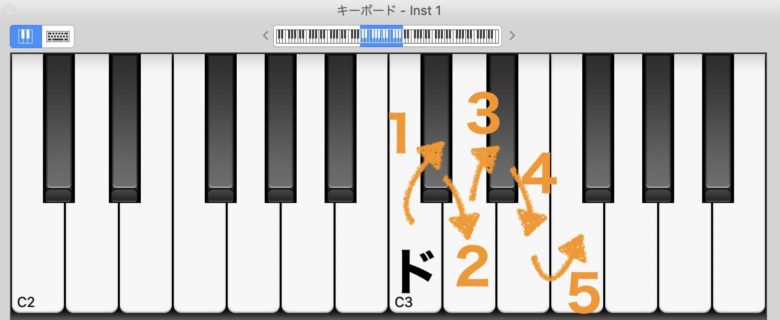
このように、ノートの配列を変えずに音程だけを変更することができるので、歌って見てキーが合わない場合や曲調を変更したい時などは、便利に使用することができます。
再生ヘッド追従ボタン
このボタンを押すことで、再生ヘッドが追従するようになります。
追従しなくていい場合は、このボタンのチェックを外しグレー色に変えておきましょう。
オートメーションボタン
オートメーションボタンを押すことで、さまざまなツマミの音量や、パンニング(位置)ボリュームなどを自動で変更させることができます。これをオートメーションと言います。
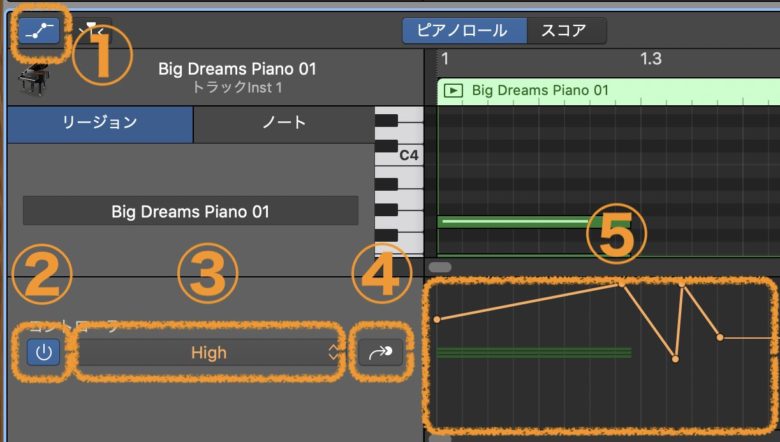
使い方は、①のオートメーションボタンを押します。
②はオートメーションのオン/オフ機能になります。オンの場合は青色に点灯します。オフの場合はグレーになります。
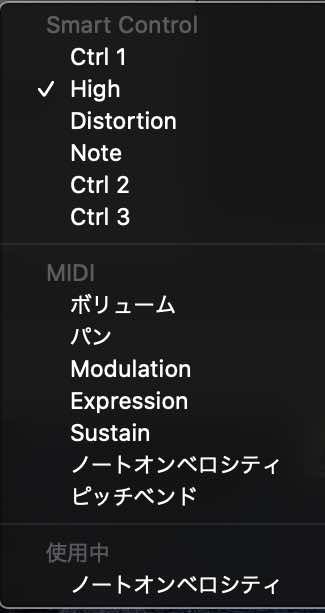
③で変更したいオートメーションを選択します。スマートコントロールの各チャンネルやボリューム、パン、サステインなどを選択できます。サステインとは、鍵盤を弾いてから音が途切れるまでの余韻のことです。
④はオートメーションを切り替えるボタンになります。パンとボリュームを設定している場合は、このボタンを押すことでパン→ボリューム→パン→ボリュームと切り替えることができます。
⑤は今適用されているオートメーションになります。
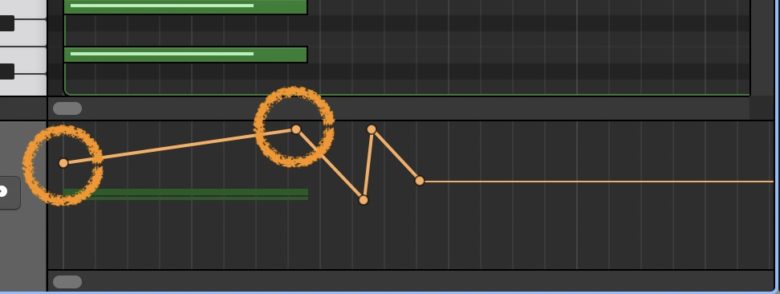
丸をドラッグすると動かすことができるので、好みの位置で設定します。
また、線上の何もないところでクリックすると、ポインタが設定されます。オートメーションを使い、楽曲の幅を広げて見るのもいいかもしれませんね。
オーディオリージョンを編集する
続いて、オーディオリージョンを編集します。オーディオリージョンもMIDIリージョンと同じ機能がありますが、オーディオリージョンにしかない機能を説明していきます。
フレックスボタン
フレックスボタンを押すことで、オーディオ波形の位置を変更することができます。変更することによって、音の位置が変わるため少し変わったパターンで再生させることができます。
ただ、あまり使いすぎると音が変になるので、使いすぎには注意しましょう。
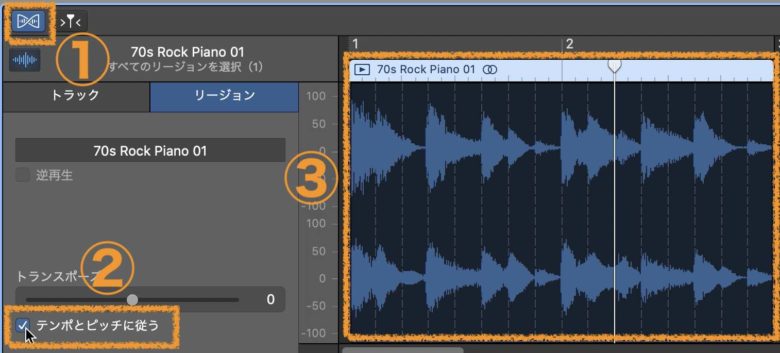
①のフレックスボタンを押す。
②テンポとピッチに従うを押す。
③オーディオリージョンに点線が入り、波形を調整することができる。
これでフレックスタイムを使用することができます。
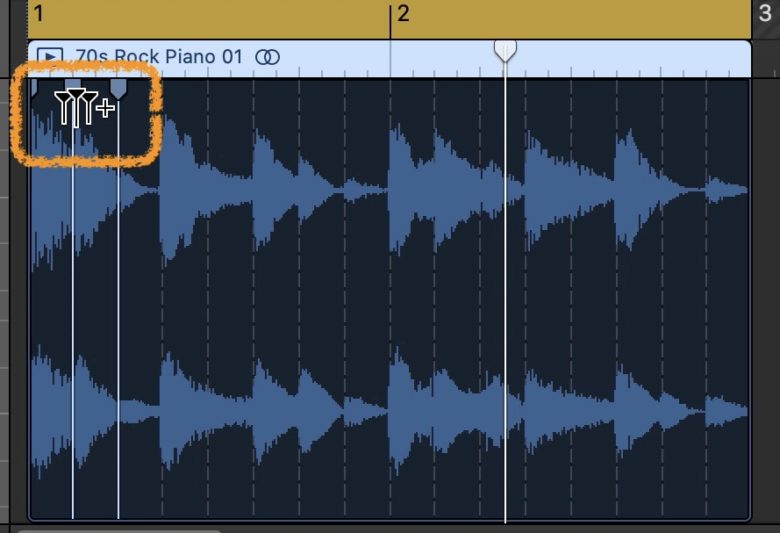
このボタンが出てクリックすると、点線が白線に変わり波形の位置を変更することができるようになります。
白線を選んで左右にドラッグすることで波形を任意の位置まで持っていくことができます。
逆再生
逆再生にチェックを入れると、リージョンが逆に再生されるようになります。シンバルの音などを逆再生させて、リバース効果を狙う使い方もできます。
結構面白い機能になるので、使って見てください。
マウスの調整
マウスの右クリックや左クリックを使いやすいように設定しましょう。
まず、リージョンで右クリックを押しても、何もメニューが出ないときは、Mac自体の設定を変更します。
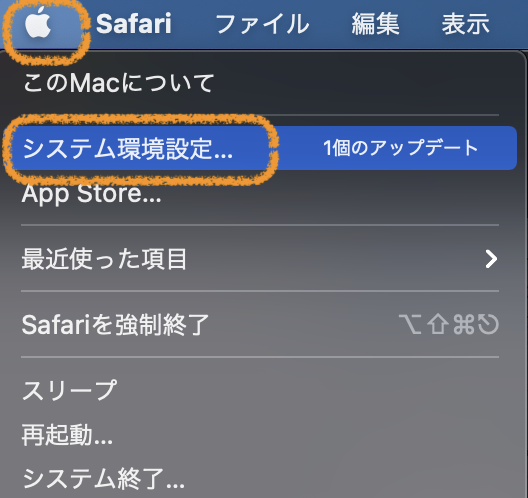
アップルマークの中の『システム環境設定』を開きます。
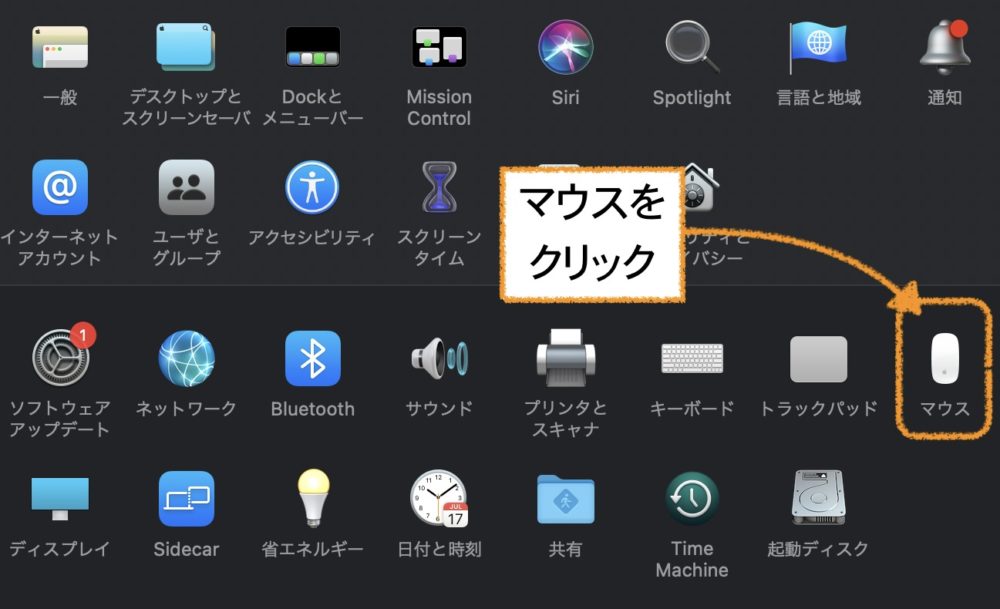
『マウス』を開きます。
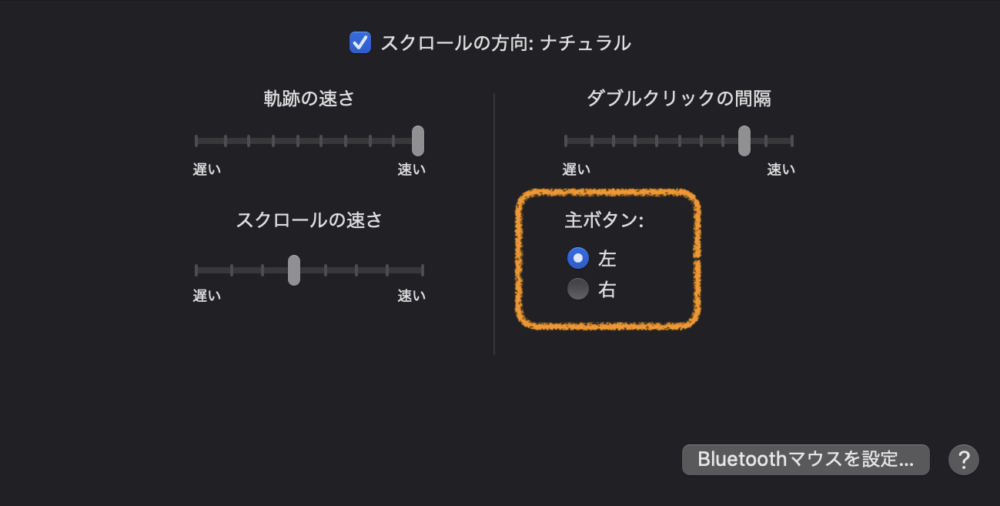
主ボタンが『左』か『右』を設定します。
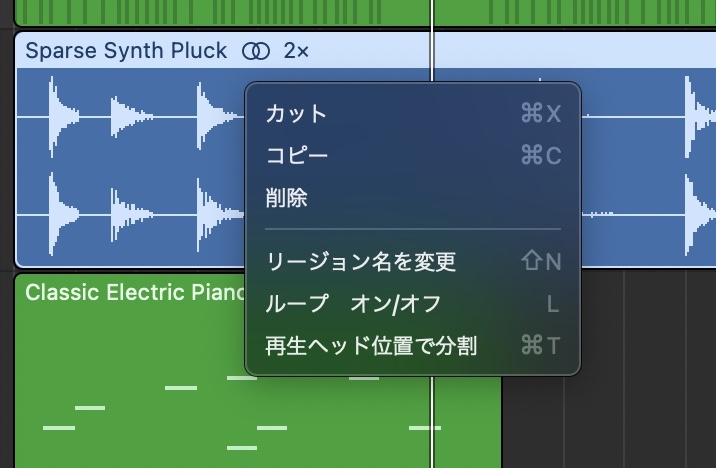
マウスの主ボタンが『左』の場合は、リージョンを選択して『右クリック』することで、リージョンのメニューを開けることができます。
メニューが出てこないという方は、一度マウスの設定を見直してみてはいかがでしょうか?
GarageBandエディタボタンの使い方まとめ
本日は、エディタ機能を見てきました。リージョンを編集する場合はこの機能を使いますが、あまり使いすぎると波形が崩れ、音が変になったりします。MIDIの場合はまだ大丈夫ですが、オーディオの場合は取り返しのつかないことになります。
上位版のLogic Proでは、GarageBandにはない機能がたくさん付いていますので、波形編集などもクオリティが高く編集できます。
GarageBandの編集に慣れてきたら、Logic Proに乗り換えてもいいんでは無いでしょうか?
それではまた。